
See the previous Scale Model Project here.
This post has been a while in the making, mainly because it has taken such a long time for this model to shape up into something I was truly happy with. That being said, I am usually unhappy with most (if not all) of my models anyway, so perhaps my hesitation to post was pointless. At any rate, I now have a relatively finished model to show you, instead of one that is missing half the paint (or has a paint job that looks vile/very amateurish).
The kit in question today is Zvezda’s lovely 1/35 Tiger II. Tiger IIs pop up everywhere in the model world, a side-effect, I suppose of German vehicles being so popular. I actually wrote a post on why I think that is which you can read here, if you so wish.
I was not originally intending on acquiring a Tiger II. As with every new build, I always seek out something that will challenge me, something where I can learn something new – an urban diorama, a complicated open-top interior, or a difficult paint job. Well, at first glance, a regular Tiger II is not very challenging. At least not a fairly bog-standard out-of-the-box build like this. It is a very bog-standard tank to model – sure, you can make it look cool, but where would I possibly test myself on this build? Well, prior to this, I had a great idea to do just that. I will not get into now – but later in the post when I discuss the actual building of the model. For now, here is the box-art.

My preconceptions of this kit, were, admittedly, not all that fantastic. My experience with Zvezda has been, so far, that they make okay/so-so kits for a bargain price (and I love bargain prices, so Zvezda is a manufacturer that goes down well in my book). The detailing is usually okay, but the tracks are usually overly loose, single-piece rubber that refuses to be stuck down by any adhesive yet formulated by humanity. Given that I also paid £25 for this kit (which I imagine is roughly equivalent to 50 ish US dollars), I was expecting more of the same. Some sacrifices in quality which then warrant a reduced price tag. One thing I have found Zvezda does best though is decals – for some reason Zvezda decals always fit and look best to my models.
This kit, however, blew all my expectations out of the water. Not only was the kit detailed incredibly well (with even some basic interior detailing in the turret), the kit also boasted an assortment of incredible goodies like single-link plastic tracks, string for a detailed tow-cable and mesh for covering the engine grilles. In fact, I needed two pictures just to show all that came with the kit.


As you can hopefully see, there was a lot of goodies.

You also have the basic interior detailing, something that could very well be the next stage of evolution in my model-making skills. I used this build as a ‘test’ bed, as it were, to try to scratchbuild some basic details myself. They were not going to be on show really, so why not? I will show you the outcome of that later.
Anyway, yeah, so the kit is really good. Absolutely worth it – beyond even a sliver of a doubt. The fact I always consciously avoid the ‘generic’ big cats when choosing a new build, yet somehow managed to get tricked into buying one and enjoying it, should tell you enough. Granted, my standards for model kits are quite low, but nonetheless I thought this kit was very worthwhile – especially for the price tag.
Now, only building the model itself. As is probably clear, building the model was very simple – granted putting the tracks together was very time-consuming – but the freedom single-links give you is very worth it. This is the best Zvezda kit I’ve made so far. I never had a single issue with the fit, and the detailing was very nice indeed. Zvezda’s SU-100 gave me nightmares with certain areas of fit, but this Tiger II was excellent in that department.

For this build, I also realised it would be far better to keep the tank into three sub-sections – the hull, wheels, and turret. Only when each were painted, would they come together.This makes things much easier to paint (and is a great improvement on my old strategy of painting everything when it was fully glued together which looking back was a pretty bad way of doing it).
So with the kit built, it was time for painting.
The idea I mentioned I had earlier? Well, I have always wanted to try to make an abandoned, rusted out tank. One that has been ditched and forgotten about for years after a war has ended. Let me show you some images that first prompted my thinking.
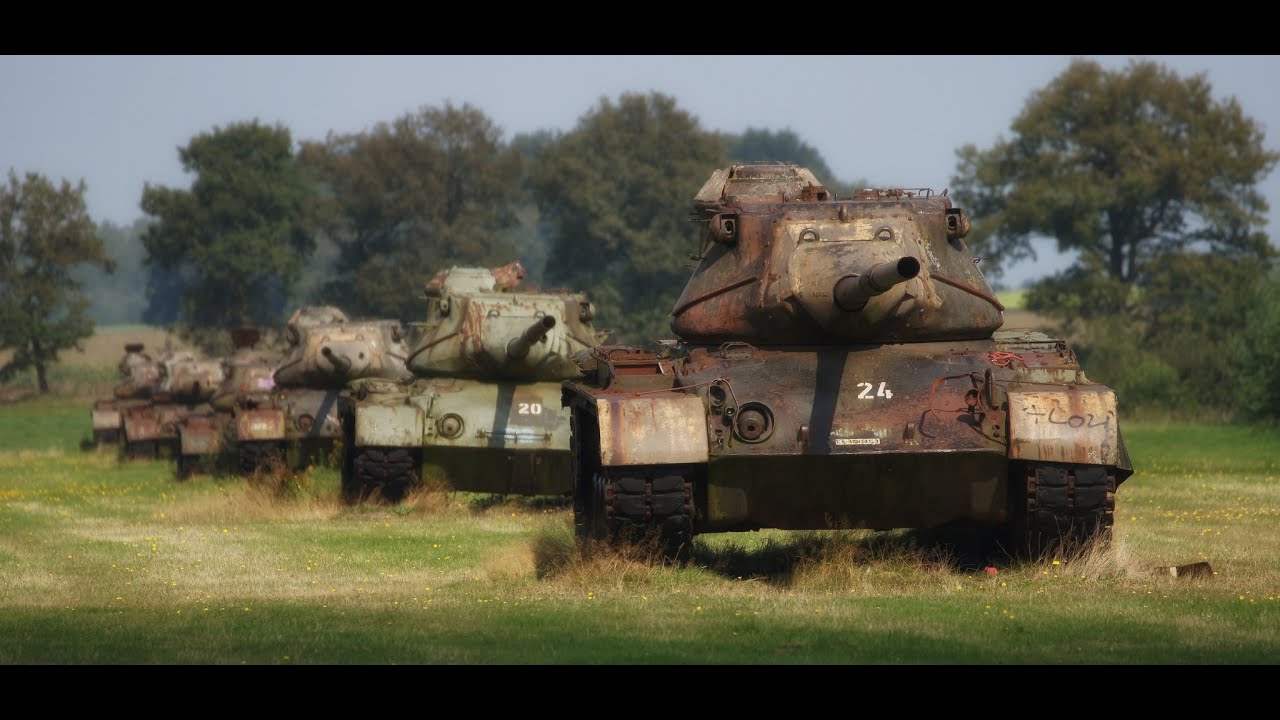
The mixture of shades as the rust affects different parts of the paint looks very good. It also looks very challenging – especially for someone without an airbrush. Painting by hand I find often has advantages over air, however.
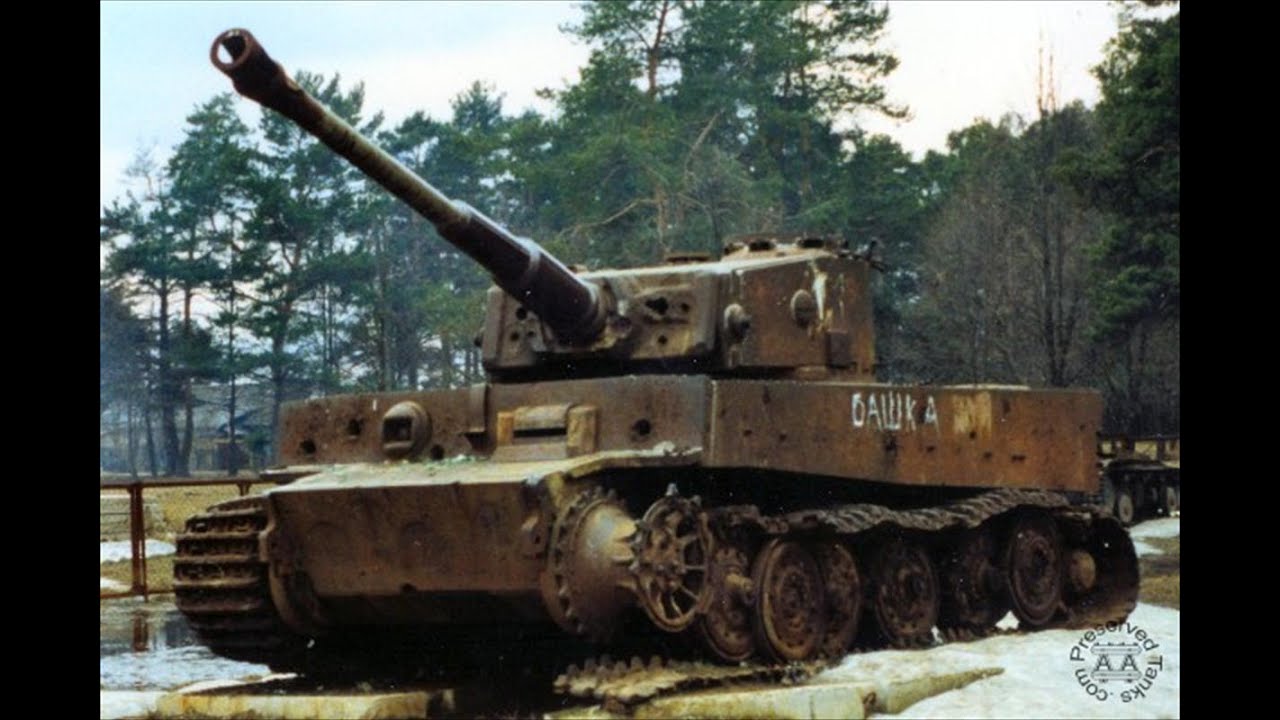
I am not talking about a tank that has been destroyed and left, necessarily – like this Tiger I here. I just refer to a vehicle that has been ‘reclaimed’ by nature, so to speak. Realistically blending all those shades of colour would be challenging, I know.

After staring at reference images, and also taking some degree of liberty, I thought I would begin. Knowing that the undercoats of most German tanks were red-oxide rust coloured, I thought I would start there.


Here it is, the finished model!
Nah, I’m just joking. This was after a couple of coats of base colour – I used Revell’s red-brown for it, which makes an excellent red-oxide colour of German undercoats. The grey is just a mixture of black and white – this is because I have reason to believe the metal of the barrel is a different kind to that of the hull (and it usually did not receive the same primer undercoat as the rest). I have seen a few images of late-war German tanks with different colour barrels. Do not worry – I fully intend on smearing rust over it anyway, so that bland grey will likely cease to exist by the end of the post.
It would be from this red-brown colour I would gradually build things up into a rustbucket.
You will notice the little bits and bobs on the side armour – because the tank is abandoned, I wanted to remove anything that would be ‘removed’ or ‘scavenged’ or whatever from the tank itself after being abandoned. This includes things like the coaxial and cupola machine-guns, and the extra goodies mounted on the side and top of the tank like tow-cables and the like. This presented the opportunity for me to glue on the clamps and hooks and all the other things these things would be attached too. I had to improvise a bit in places. Amazingly, the kit also came with a few of the exact pieces I was looking for – the ‘hooks’ that these extra bits would be attached to.
I was aware that, despite rust being very random and the epitome of a lack of care and abandonment, actually creating the rust effect would be a difficult and an even precise affair. So before I committed to slapping paint onto the basecoat, I wanted to experiment a little. Something I also wanted to try with this model is neatly showcased in this image:

That is, not only having a rusty tank – but the remains of the old paint as well.
First thing I did was use the interior of the turret to experiment a little bit.

This is the interior of the Tiger II’s turret. I used the knowledge I gained here when I went about painting the rest of the tank. The knowledge I gained was what not to do. IE: This. After painting the base colour, I then began layering watered down rust colours on top of it. It looks okay, but over a wider space I thought it might look a bit too…samey and thus unconvincing. You may also notice the basic details I tried to add (the things at the back of turret that are supposed to resemble the ammunition holders). Detail was not really my priority here, because I knew the view inside the turret was going to be obscured by darkness. Just the suggestion of detail, I thought, I would be enough.
From this, I knew I would have to not add filters, but dry-brush different shades of rust to create that variation in tone I required. So I began doing so. I am happy with the result:

In this first image, you will note that first of all, there are strange splodges of a deserty-yellow colour. This is my attempt at the ‘remains of paint’ that I mentioned earlier. I applied it in. I simply imagined that this tank would have been painted in the standard German Dunkelgelb that all vehicles were painted with after 1943. I applied the paint in various layers, getting gradually lighter as I added more. In some cases I went back and added a few dots of red-brown again, just to make it that bit more rusty. I simply searched for images of “abandoned tanks” or “rusty tanks”, and used those images as my inspiration.
The main colour, the red-oxide, has been varied and shaded by drybrushing various shades. Flat black, orange, and even brown (all mixed together in various degrees as well) has been added to make the vehicle very uneven, with more concentrated layers of flat black drybrushed in areas where I thought it best.
I have a few small concerns looking at the tank from this angle. First is the physical location of the ‘paint’ splodges – these were more or less random, except for that which is along the edges and in some of the nooks and crannies of the vehicle, where perhaps the wear and tear/water/whatever else causes rust and degradation may not have reached it. Secondly, the tracks (most are missing because I thought it would make the tank look even more degraded) may need a few more links so they would convincingly hang on the drive wheel like that – I am not sure that the weight would not make them fall to the floor in reality. The missing tracks were inspired by the picture of the Tiger I above, which has its links haphazardly hanging on the wheels. Perhaps more work is required on the tracks of the tank, on this side (they could certainly do with some more extreme sagging)

Now we see the opposite side. You can hopefully see from this side what I meant with the tracks hanging loosely on their own. There is a missing road wheel (a part of the tank, that is the wheels, I will speak about shortly) but the colour of the axle has come out…wrong. I will have to alter that.
The two most significant parts of this image are, however, the graffiti on the side of the tank along with my choice to remove the muzzle brake. The former, German for “Germans Out” is a slogan I saw on a historical image in the streets of Berlin towards the end of the war. I forget the exact image now. But I imagine that a Soviet soldier or perhaps someone against the Nazis decided to graffiti scrawl over this fearsome weapon (now not very fearsome at all) of the Nazi war machine. I used a cocktail stick to paint the letters, doing so in an easily removable mixture of white weathering powder and water, before going over in more permanent acrylic paint. My choice to remove the muzzle brake was mainly aesthetic. I have seen some very late-war Tigers without their Muzzle brakes, primarily due to how rushed the tanks were off the assembly lines.

Here you can see the front of the tank. More of the same, really. I did not add the hull machine gun because all abandoned tanks have likely been disabled/disarmed so they are not dangerous to the local populace. There is also the additional piece of graffiti on the glacis plate there – the roughly drawn Swastika. It is mean here as a kind of insult. Sort of “You Nazi scum!” is what I wanted it to imply. Indeed, the general idea of this build was the irony of this once formidable war machine having broken down into this unusable state. The lamp that is also on the upper glacis is questionable – if everything else not welded down has been removed, why not the lamp? That is something I will have to look into. No other tanks have their lamps – some however, simply have the frame with no glass or electronics. Given that nearly the entirety of the lamp is the frame, that is probably why I chose to keep it.

The rear of the tank is still something that needs work. The exhaust pipes could do with more variation, and indeed the rear in general needs a bit more done to it.

What I almost forgot to mention were the wheels. In order to create a rough, rusty texture, I actually applied the mud-mixture I used in my North-African diorama and painted it in rust. This made the area behind the wheels much more varied, and less flat-looking. I also painted it in varied shades of rust, creating a nice varied colour by coating the surface in water than dotting the colour on, allowing it to slowly mix outwards on the surface.
So yeah, a very satisfactory build. I realise that this has become a long post (it was indeed a long build). I have a few more models lined up to post, as well, including my first dabbles in Soviet aircraft, and a much larger bomber. That in addition to the ‘big one’ – my first ever full-interior. I’ll need to actually finish the models first before I post about them, so I cannot say when exactly I will post them. You could always follow the blog in order to receive updates. A WordPress account is not required – all that is necessary that you enter you email for updates.
I hope you enjoyed the post. I will probably add a gallery of the finished tank at the bottom, should anyway want to skip the text-wall and just look at the pictures. If you do have any comments/criticism, feel free to contact me.
LCR
Henschel Tiger II Image Gallery:
